最近接触到一个走公网组 K8S 集群的需求,做了一些技术调研,这里做下总结和记录。
实现方案是:先用 Wireguard VPN 软件把节点的网络打通,再正常安装 K8S 集群。
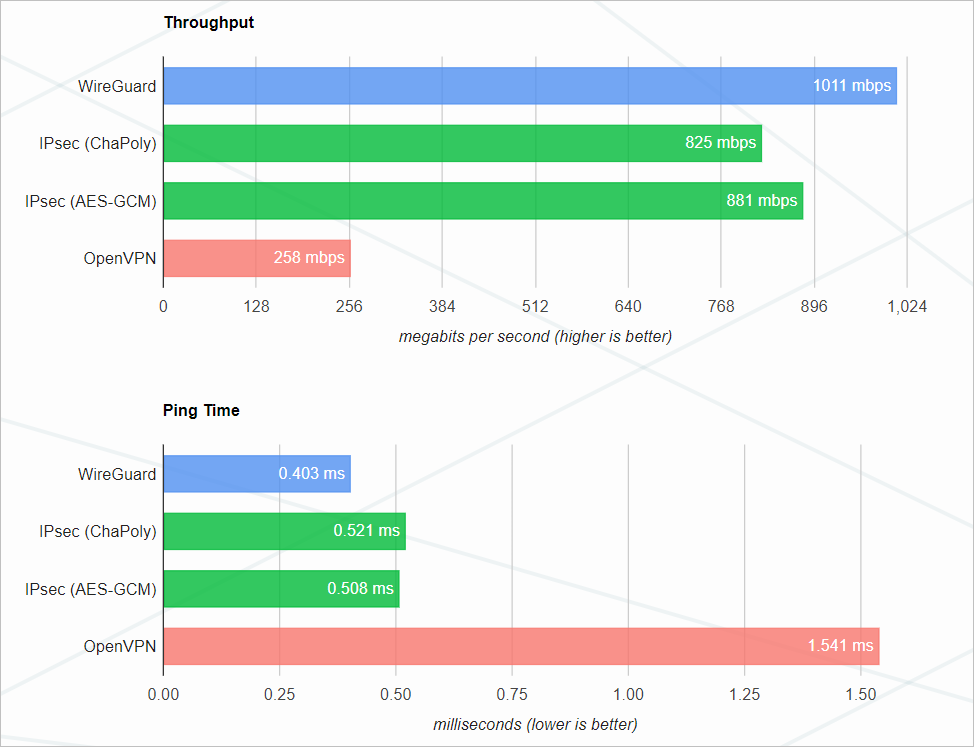
这种做的优点是 Wireguard 组网之后,节点间的通讯就是加密的了,而且性能也不差。
还有就是如果多个节点都拥有公网 IP,可以组成网状 VPN,可用性和稳定性方面都有优势。
方案的要求:
- 必须有至少一个公网 IP 才行(用于 VPN 组网和通讯)。
- CNI 我用的是 Cilium,其他方案没测试过。但是理论上应该是没问题的。
- 其他的基本要求
sudo swapoff -a
cat <<EOF | sudo tee /etc/modules-load.d/k8s.conf
overlay
br_netfilter
EOF
sudo modprobe overlay
sudo modprobe br_netfilter
cat <<EOF | sudo tee /etc/sysctl.d/k8s.conf
net.bridge.bridge-nf-call-iptables = 1
net.bridge.bridge-nf-call-ip6tables = 1
net.ipv4.ip_forward = 1
EOF
sudo sysctl --system
sudo apt-get install -y containerd
VERSION="v1.30.1"
curl -L https://github.com/kubernetes-sigs/cri-tools/releases/download/$VERSION/crictl-${VERSION}-linux-amd64.tar.gz --output crictl-${VERSION}-linux-amd64.tar.gz
sudo tar zxvf crictl-$VERSION-linux-amd64.tar.gz -C /usr/local/bin
rm -f crictl-$VERSION-linux-amd64.tar.gz
echo "runtime-endpoint: unix:///run/containerd/containerd.sock" > /etc/crictl.yaml
sudo mkdir -p /etc/containerd
containerd config default > /etc/containerd/config.toml
sed -i 's/SystemdCgroup = false/SystemdCgroup = true/' /etc/containerd/config.toml
cat /etc/containerd/config.toml | grep SystemdCgroup
systemctl restart containerd
sudo apt-get update
sudo apt-get install -y apt-transport-https ca-certificates curl gpg
sudo mkdir -p /etc/apt/keyrings
curl -fsSL https://pkgs.k8s.io/core:/stable:/v1.28/deb/Release.key | sudo gpg --dearmor -o /etc/apt/keyrings/kubernetes-apt-keyring.gpg
echo 'deb [signed-by=/etc/apt/keyrings/kubernetes-apt-keyring.gpg] https://pkgs.k8s.io/core:/stable:/v1.28/deb/ /' | sudo tee /etc/apt/sources.list.d/kubernetes.list
sudo apt-get update
sudo apt-get install -y kubelet kubeadm kubectl
sudo apt-mark hold kubelet kubeadm kubectl
|
Wireguard VPN
wireguard 是一个开源的 VPN 协议,性能和安全都是顶尖的。
安装很简单 apt install wireguard 即可。配置也比较简单,只是要提前规划好节点 IP 地址就行。
这里提一下,国外有很多多设备互联的平台,都是基于 Wireguard 做的。所以 Wireguard 除了可以组建跨云的 K8S 集群之外,还可以把本地家庭网络里的移动设备、电脑、NAS 等设备和云上网络互联互通。
wg show
wg genkey | tee privatekey | wg pubkey > publickey
wg-quick up k8s_wg0
wg-quick down k8s_wg0
systemctl enable wg-quick@k8s_wg0
systemctl status wg-quick@k8s_wg0
wg syncconf k8s_wg0 <(wg-quick strip k8s_wg0)
|
配置单点结构
cat <<EOF > /etc/wireguard/k8s_wg0.conf
[Interface]
PrivateKey = xxxx
Address = 10.89.21.1/21
ListenPort = 51870
MTU = 1420
[Peer]
PublicKey = xxxx
AllowedIPs = 10.89.21.2/32
[Peer]
PublicKey = xxxx
AllowedIPs = 10.89.21.3/32
[Peer]
PublicKey = xxxx
AllowedIPs = 10.89.21.4/32
[Peer]
PublicKey = xxxx
AllowedIPs = 10.89.21.5/32
EOF
cat <<EOF > /etc/wireguard/k8s_wg0.conf
[Interface]
PrivateKey = xxxx
Address = 10.89.21.2/32
[Peer]
PublicKey = xxxx
AllowedIPs = 10.89.21.1/32
Endpoint = <公网IP>:51870 # 这里也可以使用域名
PersistentKeepalive = 25
EOF
|
配置网状结构
网状配置略微复杂,每个服务端都需要配置全部的其他客户端 peer 信息。下面的例子是 node-01,02,03 有公网 IP 作为服务端,node-04,05 没有公网 IP 作为客户端。
cat <<EOF > /etc/wireguard/k8s_wg0.conf
[Interface]
PrivateKey = xxxx
Address = 10.89.21.1/21
ListenPort = 51870
MTU = 1420
[Peer]
PublicKey = xxxx
AllowedIPs = 10.89.21.2/32
Endpoint = <公网IP>:51870
PersistentKeepalive = 25
[Peer]
PublicKey = xxxx
AllowedIPs = 10.89.21.3/32
Endpoint = <公网IP>:51870
PersistentKeepalive = 25
[Peer]
PublicKey = xxxx
AllowedIPs = 10.89.21.4/32
[Peer]
PublicKey = xxxx
AllowedIPs = 10.89.21.5/32
EOF
cat <<EOF > /etc/wireguard/k8s_wg0.conf
[Interface]
PrivateKey = xxxx
Address = 10.89.21.4/32
[Peer]
PublicKey = xxxx
AllowedIPs = 10.89.21.1/21
Endpoint = <公网IP>:51870
PersistentKeepalive = 25
[Peer]
PublicKey = xxxx
AllowedIPs = 10.89.21.2/21
Endpoint = <公网IP>:51870
PersistentKeepalive = 25
[Peer]
PublicKey = xxxx
AllowedIPs = 10.89.21.3/21
Endpoint = <公网IP>:51870
PersistentKeepalive = 25
EOF
|
Setup K8S
部署 K8S 就比较简单了,使用 Kubeadm 就可以了。只是要注意几个地方:
- 设置 kubelet 启动参数,指定 node ip
KUBELET_EXTRA_ARGS="--node-ip=10.89.21.1"
|
- 设置 kubeadm 启动参数,指定 node ip
kubeadm config images pull --kubernetes-version=v1.28.12

cat <<EOF | sudo tee kubeadm-config.yaml
apiVersion: kubeadm.k8s.io/v1beta3
kind: InitConfiguration
skipPhases:
  - addon/kube-proxy
localAPIEndpoint:
  advertiseAddress: "10.89.21.1" # 这里要指定 k8s 主节点的 IP
---
apiVersion: kubeadm.k8s.io/v1beta3
kind: ClusterConfiguration
networking:
  serviceSubnet: "10.90.0.0/16" # svc 网段也可以提前规划好,避免冲突
  podSubnet: "10.91.0.0/16"     # POD 网段也可以提前规划好,避免冲突
kubernetesVersion: v1.28.12     # 指定安装的 K8S 版本
controlPlaneEndpoint: "10.89.21.1:6443" # 这里要指定 k8s 主节点的 IP
apiServer:
  certSANs:
    - "35.35.35.35"          # 如果要对外提供 k8s api-server 访问,这里可以填公网IP 或者 对外的域名,做到 k8s 证书里。
    - "abck8s-api-server.somedomain.com"
certificatesDir: "/etc/kubernetes/pki"
imageRepository: "registry.k8s.io"
clusterName: "abck8s"
---
kind: KubeletConfiguration
apiVersion: kubelet.config.k8s.io/v1beta1
cgroupDriver: systemd  # 这里要指定使用 CgroupV2
EOF

kubeadm init --config=kubeadm-config.yaml
|
- 设置 Cilium 参数
cat <<EOF > cilium.yaml
k8sServiceHost: "10.89.21.1"
k8sServicePort: "6443"
cluster:
name: abck8s
id: 35
operator:
replicas: 1
ipam:
mode: "kubernetes"
operator:
clusterPoolIPv4PodCIDRList: ["10.91.0.0/16"]
clusterPoolIPv4MaskSize: 16
hubble:
enabled: true
nodePort:
enabled: true
range: "30000,32767"
hostServices:
enabled: true
autoDirectNodeRoutes: false # node 节点的子网可能不同,这里要设置为 false
tunnelProtocol: "vxlan" # tunnel 模式要开启,默认就是开启的
routingMode: "tunnel" # tunnel 模式要开启,默认就是开启的
ipv4NativeRoutingCIDR: "10.90.0.0/16"
kubeProxyReplacement: "true"
# 这里看情况要不要开启3层加密:node, node2node, pod2pod
# encryption:
# enabled: true
# type: wireguard
# nodeEncryption: true
# strictMode:
# enabled: true
# cidr: "10.91.0.0/16"
# allowRemoteNodeIdentities: true
socketLB:
enabled: true
hostNamespaceOnly: true
bpf:
lbExternalClusterIP: true
daemon:
devices: ["k8s_wg0"] # 这里要指定使用 wireguard 的网卡
EOF
helm upgrade --install cilium cilium/cilium --version 1.15.7 -f cilium.yaml --namespace kube-system
kubectl -n kube-system exec ds/cilium -- cilium-dbg status --verbose
|
测试和验证
最后验证下,部署一个 nginx pod,然后访问一下,看看是否能访问到。
cat <<EOF > nginx-deploy.yaml
apiVersion: apps/v1
kind: Deployment
metadata:
  name: nginx-deploy
spec:
  replicas: 5
  selector:
    matchLabels:
      app: nginx
  template:
    metadata:
      labels:
        app: nginx
    spec:
      containers:
      - name: nginx
        image: nginx:latest
        ports:
        - containerPort: 80
---
apiVersion: v1
kind: Service
metadata:
  name: nginx-service
spec:
  type: NodePort
  selector:
    app: nginx
  ports:
    - protocol: TCP
      port: 80
      nodePort: 30080
EOF

kubectl apply -f nginx-deploy.yaml
kubectl rollout restart deploy nginx-deploy
|